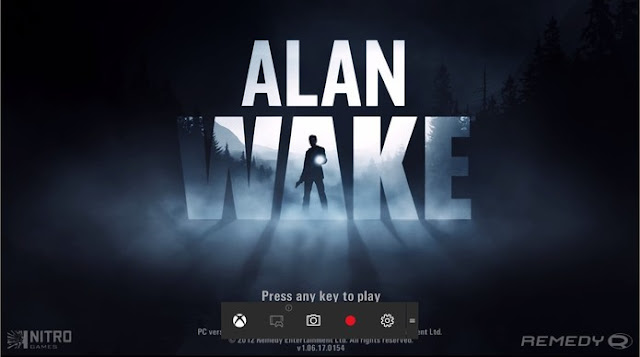
The Windows 10 has a tool capable of recording videos games through integrated games bar to the application - Xbox One and Xbox 360. So, who migrated to the new Microsoft’s operating system may share the best moments of your gameplay.
Check out the details to learn the process and begin recording as well.
To Record Videos
When an application is opened in Windows 10, the user can access the games bar, which offers the ability to record videos in program execution. Simply use the Win + G shortcut, or press the center button of the controller if the player uses the Xbox 360 or Xbox One controller.
The bar consists of five different buttons:
1) Shortcut to Xbox application;
2) Burn This (record the last 30 seconds of play, if the recording option in the background is enabled. Shortcut: Win + Alt + G);
3) Perform a screen capture (Shortcut: Win + Alt + PrtScn);
4) Start / Stop video recording (Shortcut: Win + Alt + R);
5) Recording settings.
With this, simply select the button to start recording or use the shortcut Win + Alt + R to start or stop the process. If the shooting settings in the background is on, you can also use Win + Alt + G command to save shots with the last-minute game. The videos will be automatically transferred to the recordings folder, located by default in C: \ Users \ [username] \ Videos \ Captures.
Normally, the system recognizes applications that games and make them compatible with the bar. In some cases, however, the window opens with the question "Do you want to open the games bar?" When the Win + L shortcut is used. Simply select "Yes" to allow Windows to cause the pass program to be compatible. This also works to record videos from other types of software.
To Set Video Recording
Before you start recording the games, it is interesting to set capturing videos. To do this, open the app and Xbox on the left, select the last option, from top to bottom to display the settings menu. Then choose the "DVR Games" tab.
In this menu, you can find the following options:
Keyboard shortcuts: In addition to providing shortcuts to write commands, the player can also customize them for the following commands:
Command - Standard Shortcut
Games open bar: Win + G
Burn it: Win + Alt + G
Start / stop: Win + Alt + R
Capture screen: Win + Alt + PrtScn
Show / eye timer: Win + Alt + T
Write this: With the option, the user defines whether recording on background. If enabled, you can use the Win + Alt + L shortcut to record clips of the last moments of the game. Although interesting, this function can affect the performance of the games.
Clips: In this option, the user sets the maximum time of the catch. When the file reaches the stipulated duration, the clip is automatically saved. The default duration is one hour, but the player can change for 30 minutes or two hours if you prefer.
Save Catches: Shows the folder where the video and screenshots files are saved. The default location is C: \ Users \ [username] \ Videos \ Captures. Unfortunately, you can not change it via the Xbox application.
Video Encoding: In this option, the player can define the quality and resolution of the recordings. Unfortunately, the only two options for the two categories are "Normal" and "High", without further specification.
Audio: Select if the catches have audio. If so, the player can choose the audio bit rate to 96, 128, 160 or 192 kbps. This option is enabled by default.
During the game, these settings can be changed directly from the fifth bar button.

Comments
Post a Comment