Despite the time between the launch of the first generation consoles, incredibly most popular video game devices of the eighties and nineties still compatible with modern components. Certainly some devices may have problems with analog signals, but in theory most TVs available in the current market should be able to read the information send by a Nintendo or Sega Master System.
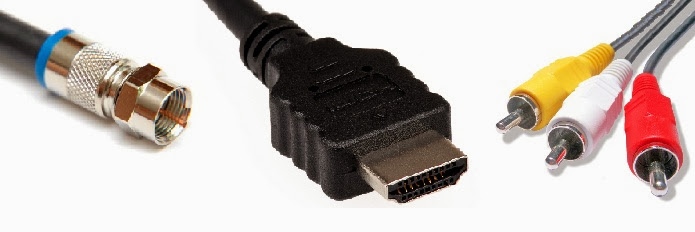
The three most common types of connections today are HDMI, RCA and coaxial cable. Of these three, the last two were already employed to make the game work since the 80s. HDMI is the best of them all responsible for digital signals in HD. Among the usual signs, RCA Coax is much higher than that lost quality to "squeeze" audio and video signals in one cable.
To make this more practical explanation, here is a step-by-step guide to hookup the two most popular consoles of the 80s and 90s to modern TVs:
How to Install Coaxial Cable on Old Nintendo System
The Nintendo was the best selling game of the eighties, with 62 million units. Although it also come with RCA inputs which make the connection process even easier, we use the traditional 'box' (called RF Box) which was the same time of other systems like Atari and Sega Master System.

1. Connect the RF cable from the Box on your console, which can already be properly plugged into the nearest outlet.
2. The output of the 'box' or RF Box can be connected to the coaxial input on your TV, usually associated with Antenna, Cable or Satellite TV. If this connection is occupied the previously release cable then an adapter is required to provide two entries in one.

3. Change the channel on your TV to the channel that is selected by the game. In the case of modern television that also requires choosing the right video input, these channels are usually in the form 'Air' or 'cable' on their menu.
4. Turn on the game, if the channel is correct it should appear immediately on the screen. Otherwise do a rescan on your TV by the different menu entries (Input Sources). Often it is also necessary to make a new tune the channels for that leave the console on and tap this option to find the designated channel.
5. Have fun with the great classics games.
For televisions that do not have Coaxial input, you can always try other things: as an adapter for RCA coaxial, or use inputs from other devices connected to your TV and your DVD / Bluray or receiver of cable TV.
How to install Super Nintendo via RCA cable
The Super Nintendo was the third best-selling video game console of the nineties, second only to the Gameboy and the PlayStation. All home consoles of this period as the Mega Drive and Nintendo 64 were connected to the TV via the RCA input.

1. Connect your SNES that may already be properly plugged into the nearest outlet with special cable to RCA inputs.
2. Connect the RCA cable to the entries respecting the colors displayed. Yellow for video, red for right audio and white for left audio. If your TV is not stereo, only use the red or just white, as indicated in the connectors on the TV.
3. Turn on the game and television. Just now looking for the right input, usually it will be in VIDEO 1, 2 or 3, but it should not be hard to find.
4. Your game is running smoothly. Have fun with the great classics that you play.
Very useful information ! We generally used cables in LED/LCD, your post is useful to install coaxial cable with Old Nintendo System. Get digital coaxial cable for audio transmission.
ReplyDelete