Create your own missions for Arma 3: The first part of our guide shows you the basic operation of the extensive editor that you can use for creating your own missions.
We start with the basics: What is the editor, how do I add a units and waypoints? The individual basis based on points you can find screenshots of the text below:
The first unit
Let's start with the placement of your figure. Please press F1, look for a nice and quiet spot on the map and make a double click: The unit window pops up. In "Class" we choose "Armored" in "Control", "player as Gunner". In "Azimuth" we give the direction to look in district lines. Click "OK", the window closes and we have our first unit placed: in this case, an armored vehicle, in which the player takes the place of the gunner.
The first waypoint
Pressed F4 and look from a different point on the map, little bit far from the unit, and takes again a double: Now the "Waypoints" window opens. In the "Type" we select "Seek and Destroy". Those who wish can under "Placement radius" specify a number in meters, and the waypoint is then placed in a point within that radius. Click "OK" and our first waypoint is set.
The first enemies
Now press F1 again at any point between our vehicle and the waypoint, select the "Side" OPFOR, under "Class" cars and "unit" transportation. Then choose the F4 and set a waypoint for the enemy unit, preferably close to the waypoint and choose the enemy unit "Seek and Destroy". The enemy unit will then circles around the waypoint, search for unit of our group and attack on sight. Although this is only once in a useful free (unarmed) transport, but should take care not in the first mission.
The first trigger
Here our mission is to destroy all the troops of the enemy faction. We will create a trigger by double-F3 and right next to the enemy unit. The default setting for the trigger amount is only 50 meters. Thus, the transport leaves this zone immediately; we extend the perimeter of 1,000 meters. Thus, we ensure that the transport must be really destroys in order to successfully complete the mission. In the "Type" we select "End". Under "Activation", however, we carry "OPFOR" one. Then we click a little lower "present distress" on. This means that the trigger fires and the mission completes when there are no (whole) OPFOR unit is located within a radius of 1,000 meters.
The first test
Now we take the test: Clicking on "Preview". If everything was done correctly, we find ourselves as a gunner in an armored vehicle again. This is also immediately towards our waypoint in motion. On the way we meet the enemy transport. The commander of our vehicle will informed highlight the target and give the order to attack. Of course, the enemy is aware of the situation - against armored trucks can not do anything. Power of the cannon and use the sweeping truck. The game logic continuously checks whether or OPFOR units in the trigger area are available. Is the truck flat, the trigger is activated and you have completed the mission.

The screenshot explains the various elements of the editor that we need for a first small mission. Let not deter you from the thing, actually it is easy to see through. Once you've figured it, the editor is quite lively and the best friend of the Arma-player.

The overview map of Arma 3: This view is represented not only in the editor, but also during the game. Veterans of the predecessor can be found here, the novice may confuse the diversity of cryptic characters first. However, in principle it is simple: The green areas mark the forest, while the jagged black objects indicate rock formations. CSAT units appear on the map in red, NATO units in blue. Waypoints for the troops are represented by black circles and lines in the editor.
Arma 3 Editor: The character

With the most powerful editor you can make an excellent ratio of spend time and later result both exciting single-as well as multiplayer missions. And who throws like blue beans to get together with his buddies, of course, set a bit of value to a custom character: Arma 3 offers you the opportunity to change the look of your Alter Ego on a number of parameters. On "Configure" in the main menu you get to the profile and can adapt to your individual wishes the character.

The editor window, which is probably most commonly used: "Insert Unit". Here you select the type, class, and fraction of a unit to be inserted. Another set of parameters allows you to completely customize the unit. How much ammo has the unit? Is he hurt? What is artificial intelligence? Finally, it should be so seamlessly integrated into the context of the mission to provide a coherent and credible overall picture.
Arma 3 Editor: Insert Waypoint

With the window "Insert Waypoint" can send your units through the area. This is important because a unit without waypoints bums around aimlessly in botany. The waypoints window gives you the opportunity to give the units of the detailed mission orders, which then run independently. Here is the slider for the artificial intelligence comes again into play: If the "skill" is very high, the squad will mow down everything in its path, he is set low, we produce little more than changing targets. In the following, we show the "Waypoint" window in detail:

"Trigger" to solve various "events" from the game world. These events can range from complex, scripted intros, cutscenes to the simple release of a Sound effect. In the first part of the workshop we will limit ourselves to finish with a simple trigger the mission in case of success. Without an end to the mission would go on forever, even if the self-imposed mission objectives have been met.

The "Effects Window" controlled effects for both waypoints as well as trigger. In this way, as sound effects or music tracks can be recorded at certain points of a mission. So you can be heard at special points exciting music to make the gaming experience even more intense. In addition, thise window intros, cutscenes or the end of a Mission to be inserted.
Arma 3 Editor: Setting the framework
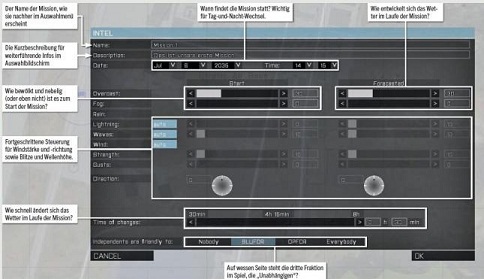
The "Intel" window allows many fundamental settings of our mission. First, of course, the name and description, but also weather effects or the date are intended here. This is important because of the changing times of sunrise and sunset with the season. In addition to the weather, you can also influence the weather development; we can begin a mission in bright sunshine and ensure that in the course of their rears dense fog. Even lightning, wind direction and speed are adjustable. In addition, we can even determine the wave height of the sea. Madness!
Comments
Post a Comment