Many users have trouble setting up the audio when connecting a PC to TV via HDMI. And one of the results is just transfer the image without sound. To help solve this issue, see our simple tutorial on how to put the TV audio as standard on the computer. This way the sound is played by TV and not on the computer.
Step 1. Connect the HDMI cable to the TV and notebook / computer. Wait for it to recognize the connection. With this, the computer screen contents to be displayed on television;
Step 2. Now comes the part of putting the audio to work, if it is not automatically recognized. Click the "Start" menu and go to the control panel on the computer. Then select the item "Sound" to adjust the settings;
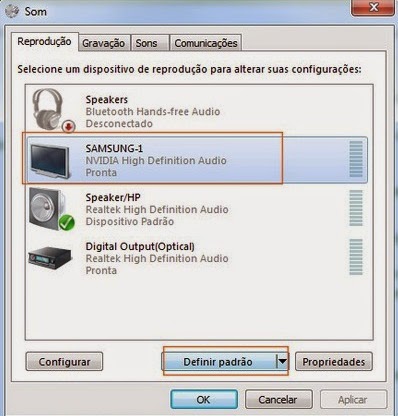
Step 3. an option indicating the TV audio will be displayed, which usually has its brand. Click this item and select "Set as Default";
Step 4. Note that the green icon will switch to the TV option. Finish by clicking "Ok";
Step 5. Ready. now the audio will come out the speakers of the TV normally. To adjust the volume click the traditional icon in the right corner of the screen and select "Mixer". Note that the TV audio will be included with its own adjustment bar. To change the volume level just drag down and up.

Comments
Post a Comment