If your Internet access is wired and you do not have a Wi-Fi router to distribute the connection, you know that it is possible to use a computer or notebook to do this. You need a PC with Windows 8 or Mac. Then connect the cable from the Internet connection into the Ethernet jack on your computer and follow the steps in this DTGReviews tutorial.
How to share a wired Internet via Wi-Fi on Mac
Sharing an Internet connection in OS X is very simple:
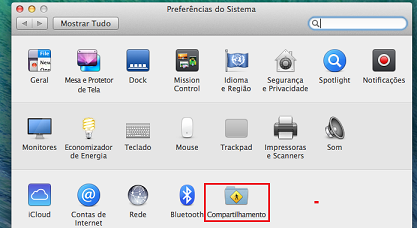
Step 1. Open "System Preferences" by clicking its icon in the Dock of OS X;

Step 2. Within the "System Preferences", click the "Sharing" option;
How to share a wired Internet via Wi-Fi on Mac
Sharing an Internet connection in OS X is very simple:
Step 1. Open "System Preferences" by clicking its icon in the Dock of OS X;

Step 2. Within the "System Preferences", click the "Sharing" option;

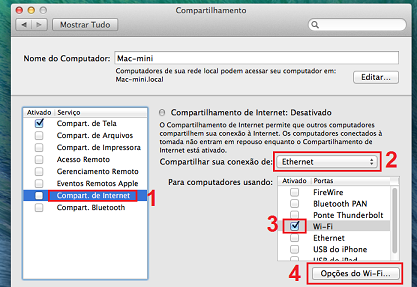
Step 3. The sharing window where you should click on the item "Share your connection” which is in the box on the left side of the window. Click the list and select the wired connection ("Ethernet"). In "Table To computers using:", select the Wi-Fi connection on your Mac Finally, click the "Options Wi-Fi ..." button;

Step 4. In the window that appears, set the parameters of the Wi-Fi network by placing name, channel, and security password according to your needs. Then click the "OK" button to confirm;
Step 5. Back to Sharing window, click in the box next to the item "Share Internet". Then click "Start" on the confirmation screen that appears. Thus, sharing is already active;
Step 6. When you want to disable the feature, just go back in and clear the screen sharing.
How to share a wired Internet via Wi-Fi in Windows 8
Although Windows 8 allow this type of sharing natively, the process is quite complicated and requires a series of commands on the Windows Command Prompt. A simpler way to do this is using the Virtual Wifi Hotspot, which is very small and free. Moreover, with a few adjustments in the process below, you can also do the same in Windows 7.
Step 1. You have to download the Virtual Wifi Hotspot and install it on your computer;
Step 2. Disconnect the computer from any WiFi network To do this, click the network icon in the task bar. When a sidebar with a list of networks appears, click the name of the network you want to disconnect, and then click the "Disconnect" button;
Step 3. Run the Virtual Wifi Hotspot, by clicking its icon on the desktop. If the administrator password is requested, enter it or just confirm the authorization;
Step 4. In the first field of the program screen, enter the name of the wireless network to be created and in the second, type the password that is used to join this network. In "shared connection", select the connection that is connected to the Internet, if the wired connection (in this tutorial example, "Ethernet"). Finally, click the "Start Virtual Router Plus";
Step 5. A message of "Success" appears in the taskbar confirming that routing is working;
Step 6. When you want to disable the feature, just go back into the application screen and click on "Stop Virtual Router Plus" button;
Ready. The wired Internet connection can now be used by other equipment, for this, they need only connect to the new Wi-Fi network using the data and password entered in the configuration step.
Comments
Post a Comment